Most of this error occurs, after installing a Windows Update or after closing you computer without performing a normal shutdown (e.g. after a power outage). The “Automatic Repair couldn’t repair your PC … Log file: C:\Windows\system32\Logfiles\Srt\SrtTrail.txt” error message, can be faced on a Windows 10 based computer.
If you are experiencing the blue screen problem “Automatic Repair couldn’t repair your PC (SrtTrail.txt)”, then follow the steps below to resolve it…
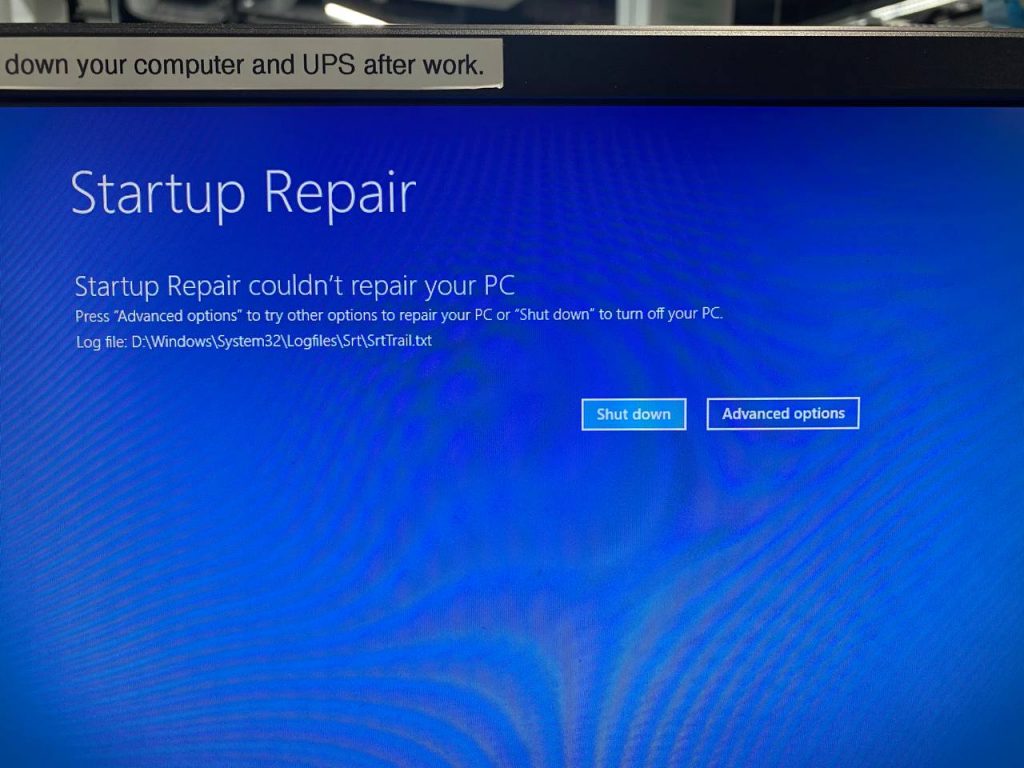
Automatic Repair couldn’t repair your PC
How to FIX: Windows Error Automatic Repair couldn’t repair your PC (Log file: SrtTrail.txt).
Method-1. Disable Driver Signature Enforcement.
This first method to fix the “Automatic Repair couldn’t repair your PC – Log file: D:\Windows\system32\Logfiles\Srt\SrtTrail.txt” error in Windows 10, is to disable the “Secure boot” option in Bios and the “Driver signature enforcement”. To do that, follow the steps below:
Step 1. Disable Secure Boot in BIOS
1. Power On your system and press the corresponding key* to enter into BIOS SETUP
* Usually is the DEL or F1 or F2 or F10 key. (depends on manufacturer)
2. Look at Security or at Boot Options settings,* to find the Secure Boot option and Disable it.
* Note: The location of the Secure Boot setting in BIOS depends on device’s manufacturer.
3. Save settings and EXIT BIOS Setup.
4. Let Windows to boot normally. If Windows cannot start then continue to step-2.
Step 2. Disable Driver Signature Enforcement.
1. If you PC doesn’t start normally, then at the “Automatic Repair couldn’t repair your PC” error screen, click Advanced Options and then Startup Settings.
2. At Startup Settings, press the F7 (or “7“) key to Disable driver signature enforcement.
3. If Windows starts normally,* then continue to Step-3 and permanently disable the driver signature checking.
* Note: If Windows cannot start, enable the Secure Boot in BIOS Settings and continue to Method-2.
Step 3. Disable Driver Signature Enforcement permanently,
1. Open an elevated command prompt.
2. At command prompt windows, type the following commands in order.
- bcdedit -set loadoptions DISABLE_INTEGRITY_CHECKS
- bcdedit -set TESTSIGNING ON

3. Reboot your computer.
– If you want to enable signature enforcement in the future, then open Command Prompt (with administrative rights) and type these commands in order:
- bcdedit -set loadoptions ENABLE_INTEGRITY_CHECKS
- bcdedit /set testsigning off
Method 2. Repair System Files and Windows with the SFC & DISM Tools.
1. Boot your computer from the Windows Installation media.
2. Press Next at Language options screen.
3. Choose Repair your computer.
4. Then choose Troubleshoot -> Advanced Options –> Command Prompt.
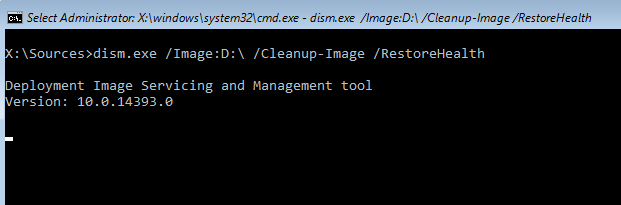
5. Give this command to repair the offline Windows image: *
- dism.exe /Image:D:\ /Cleanup-Image /Restorehealth
* Notes:
1. Where “D” = the Windows OS drive. (See method 2 above to find the OS drive letter, and change it according your situation).
2. Don’t forget the space between \ & /
3. If the above DISM command cannot run with “error 5: The scratch directory size might be insufficient to perform this operation”, then give the following commands:
- mkdir D:\Scratch
- dism.exe /Image:D:\ /ScratchDir:D:\Scratch /Cleanup-Image /Restorehealth
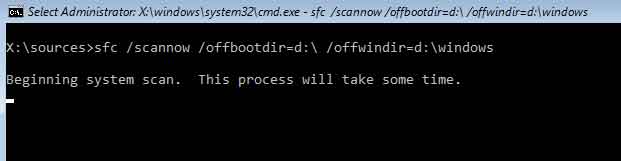
6. When the DISM operation is completed, give the following SFC command to complete the repairs. *
- SFC /SCANNOW /OFFBOOTDIR=D:\ /OFFWINDIR=D:\Windows
* Notes:
1. Where “D” = the Windows OS drive. (Change it according your situation)
2. Don’t forget the space between \ & /
7. When the operation is completed, reboot your computer. If your system fails to boot again, proceed to next method.
Method-3. Try to Repair the Boot Configuration Data (BCD).
The third method to fix the “Automatic Repair couldn’t repair your PC – SrtTrail.txt”, is to repair the BCD. To do that:
1. Boot your computer from the Windows recovery media.
2. Press Next at Language options screen.
3. Choose Repair your computer.
4. Then choose Troubleshoot -> Advanced Options –> Command Prompt.
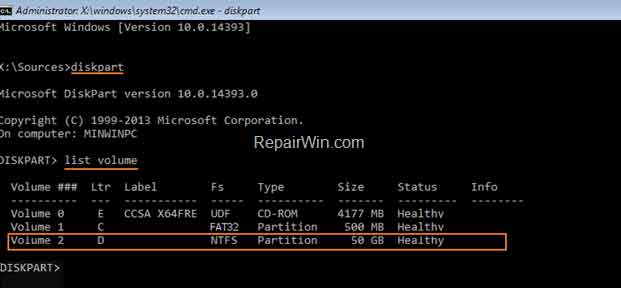
5. In command prompt type: diskpart & press Enter.
6. In “DISKPART” prompt, type: list volume & press Enter.
7. Now, according your case…
a. If you see a FAT32 (FS) partition, then you own a UEFI based system.
At this case, follow the instructions at Case A. Repair BCD on UEFI Based Systems.b. If you don’t see a FAT32 (FS) partition, and all partitions are NTFS, then you own a BIOS/MBR/Legacy based system.
At this case, follow the instructions at Case B. Repair BCD on LEGACY Based Systems.At the example screenshot below, the system is UEFI based
Case A. How to Repair BCD on a UEFI Based System.
1. If your system is UEFI, then notice the Volume number of the FAT32 * partition and the drive letter of the Operating System (OS) volume.
e.g. At the example screenshot below, the FAT32 partition is located at “Volume 1” and the OS volume has the drive letter “D“.
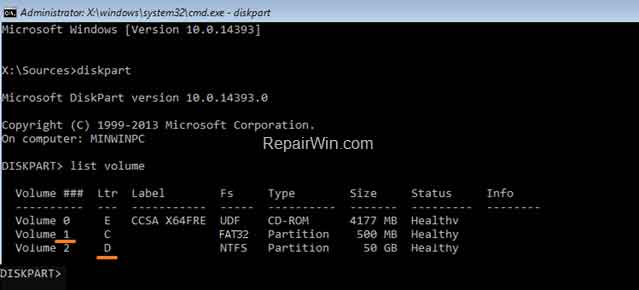
How to Repair BCD on a UEFI Based System
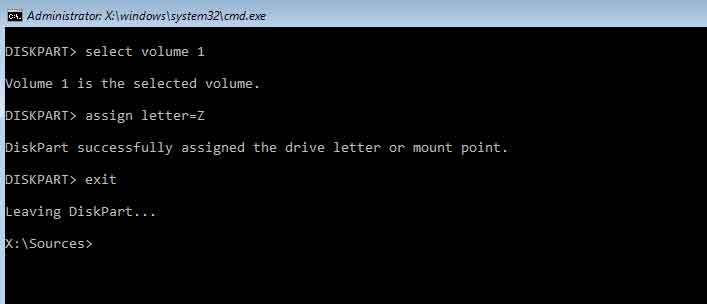
2. Now select the FAT32 volume, with the following command and press Enter. *
- select volume 1
* Note: Replace the number “1”, with whatever volume number is your System drive.
3. Then assign the drive letter “Z” at the selected volume with this command:
- assign letter=Z
4. Type exit & press Enter, to close DISKPART utility.
5. Finally give the following command to fix the boot configuration data and press Enter. *
- bcdboot D:\windows /s Z: /f ALL
* Note: Replace the letter “D” with whatever drive letter it is for your OS Volume.

6. Type exit & press Enter to close command prompt.
7. Remove the recovery media and Restart your PC.
8. Test if your system can boot to Windows normally. If your system still does not start, then continue to next method.
Case B. How to Repair BCD on a LEGACY Based Systems.
1. Type exit to close the DISKPART utility.
2. Then give the following commands in order:
- bootrec /fixmbr
- bootrec /fixboot
- bootrec /rebuildbcd
3. If after executing the last command, you receive that “Total Windows installations: 0”, then continue to the next step (4), otherwise skip to step 5.

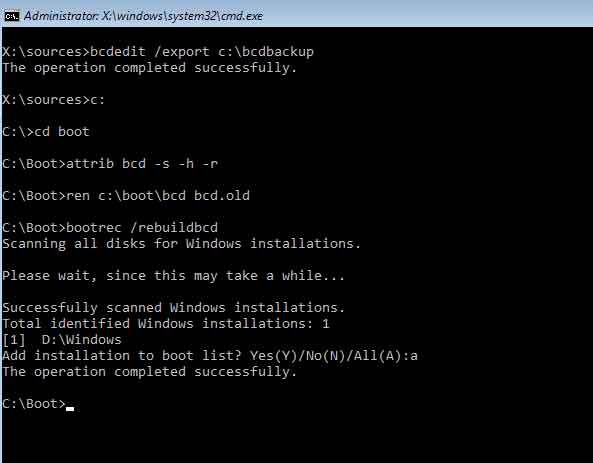
4. If you receive that”Total Windows Installations=0” then give the following commands in order:
- bcdedit /export C:\bcdbackup
- C:
- cd boot
- attrib bcd -s -h –r
- ren C:\boot\bcd bcd.old
- bootrec /rebuildbcd
5. Press “A” to add the installation to boot list and press Enter. Then restart your system.
6. Close command prompt window.
7. Restart your computer and if the boot problem persists, then continue to next Method.